Enhancing Visibility and Management
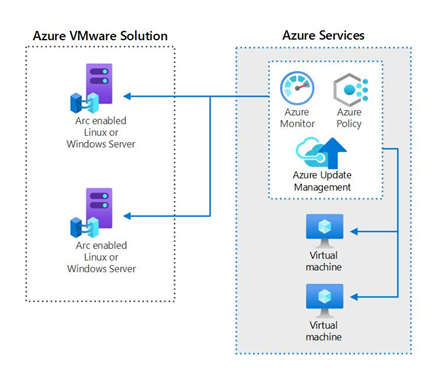
Unified Management: Simplifies governing and securing both Windows and Linux servers across private clouds, like Azure VMware, and on-premise datacenters.
Azure Consistency: Connect a hybrid machine to Azure, transforming it into a ‘Connected Machine’ with its own Resource ID – seamlessly integrating it within Azure’s ecosystem.
Azure Arc Benefits:
- Comprehensive OS and workload monitoring.
- Streamlined automation with runbooks and Update Management.
- Integration with flagship services, including Microsoft Defender for Cloud.
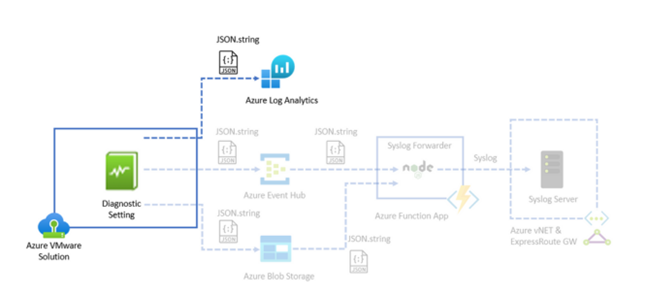
Using integration of Azure Arc will transform the way you can manage operations across various environments, uniting on-premises, multi-cloud, and edge infrastructures. Azure Arc ensures that regardless of where your servers are located, be it on Azure VMware Solution or on-premises, they’re governed consistently and securely under one umbrella.
What does Azure Arc offer?
- Monitoring: It gives detailed insights into our systems irrespective of their location.
- Automation: With Azure Arc, tasks are streamlined, configurations are maintained, and updates managed, reducing human intervention and error.
- Security: Azure Arc doesn’t just monitor; it actively protects, enhancing our defense against threats by leveraging services like Microsoft Defender for Cloud.
In summary, it’s more than just oversight; it’s a holistic approach to driving the business through integrated cloud services.
Demo
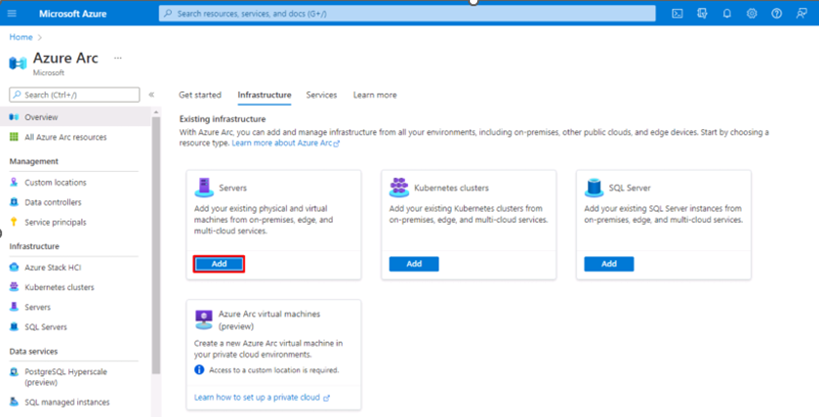
- In Azure Portal, on the Servers – Azure Arc page, select Add at the upper left.
- On the Select a method page, select the Add servers using interactive script tile, and then select Generate script

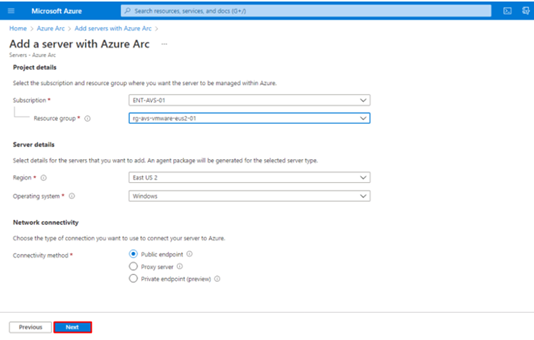
- On the Generate script page, select the subscription and resource group where you want the machine to be managed within Azure. Select an Azure location where the machine metadata will be stored and Operating system
- Select endpoint (Public unless otherwise needed)
- On the Tags page, review the default Physical location tags suggested and enter a value, or specify one or more Custom tags to support your standards.
- Select Next: Download and run script.
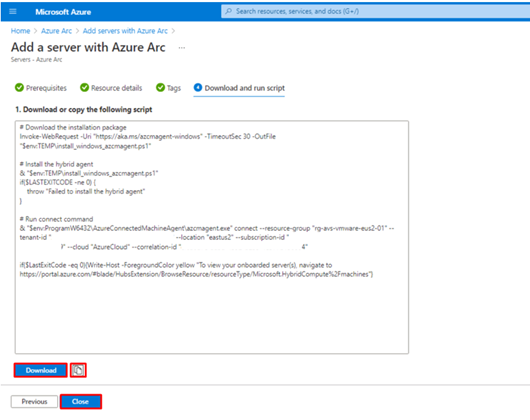
- On the Download and run script page, review the summary information. Script can be copied to clipboard or downloaded, and we will need to execute it on the machine that will be onboarded to Azure Arc
- Log in to the server.
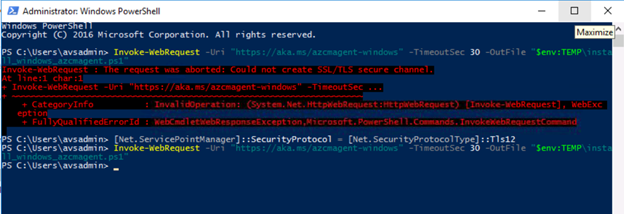
- Open an elevated PowerShell command prompt
- By default, PowerShell uses TLS 1.0 the site security requires TLS 1.2. To enable TLS 1.2 run the following command:
[Net.ServicePointManager]::SecurityProtocol = [Net.SecurityProtocolType]::Tls12
- Change to the folder or share that you copied the script to, and execute it on the server by running the ./OnboardingScript.ps1 script – the script will download the ConnectedMachineAgent, install it and run the regitration command
- During the installation, Azure credentials will be required for the registration
- To install the Linux agent on the target machine that can directly communicate to Azure, run the following command:
bash ~/Install_linux_azcmagent.sh
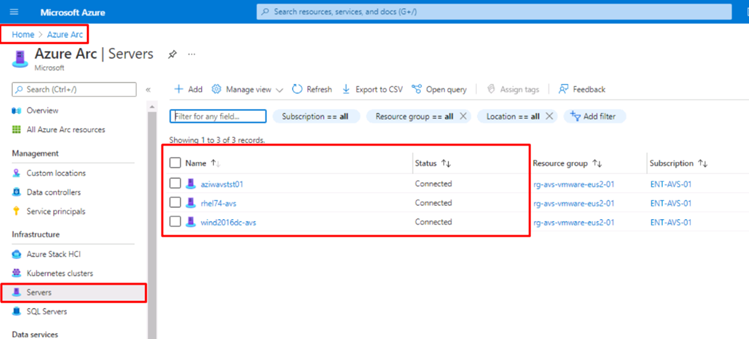
Verify Arc-enabled servers in Azure Portal
- After installation and configuration are completed, in order to view the servers in Azure navigate to Azure Arc and select Servers blade