Every time a new technology matures, a platform emerges that hides the complexity and lets you focus on the problem. Docker did it for containers. Kubernetes did it for orchestration. Azure AI Foundry is doing it for AI agents – and understanding what it actually handles for you is the first step to using it well.
Let me walk you through what Foundry is, how it’s structured, and how I’d approach getting started – whether you’re a developer spinning up a proof-of-concept or an architect designing a production workload.
What Problem Does Foundry Solve?
Before Foundry, building an AI agent meant stitching together a lot of moving parts yourself:
- Managing conversation state between turns
- Handling tool calling and parsing results
- Storing and retrieving context across sessions
- Dealing with infrastructure – compute, identity, secrets
- Monitoring what your agent actually did
That’s not impossible – I’ve done it manually – but it’s tedious, error-prone, and not the part of the problem you should be spending your energy on.
Azure AI Foundry Agent Service handles all of that. You focus on the agent’s purpose, instructions, and tools. Foundry handles the plumbing.
How Foundry Is Structured
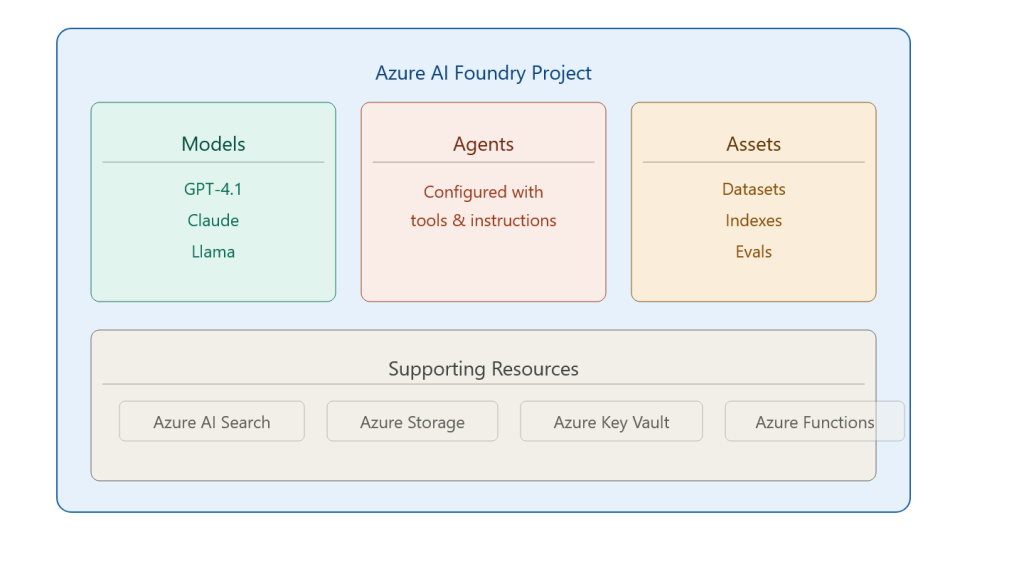
Supporting resources connect underneath: Azure AI Search for retrieval, Azure Storage for files the agent reads and writes, Key Vault for secrets, and Azure Functions when you need custom tool logic.
The Two Ways to Build: Portal vs. VS Code
This is a question I get in every discussion. Which approach is right?
Foundry Portal (web-based):
✅ No local setup required – spin up in minutes
✅ Visual configuration – great for prototyping and demos
✅ Centralised management dashboard
✅ Perfect for sharing with non-developer stakeholders
❌ Less suited for complex code-first logic
❌ Harder to version control
Visual Studio Code (developer-centric):
✅ Build agents alongside your application code
✅ Full Git integration – your agent config lives in version control
✅ YAML-based config – readable and diffable
✅ Offline development before deploying
❌ Steeper setup curve
❌ Not ideal for quick stakeholder demos
My practical advice: use both. Use the portal for initial exploration, concept validation, and stakeholder walkthroughs. Switch to VS Code once you’re moving toward production. Most teams I’ve worked with settle into this pattern naturally after a few weeks.
The Typical Development Workflow
Here’s the 8-step workflow I teach, because seeing the shape of the whole process matters before diving into any single step:
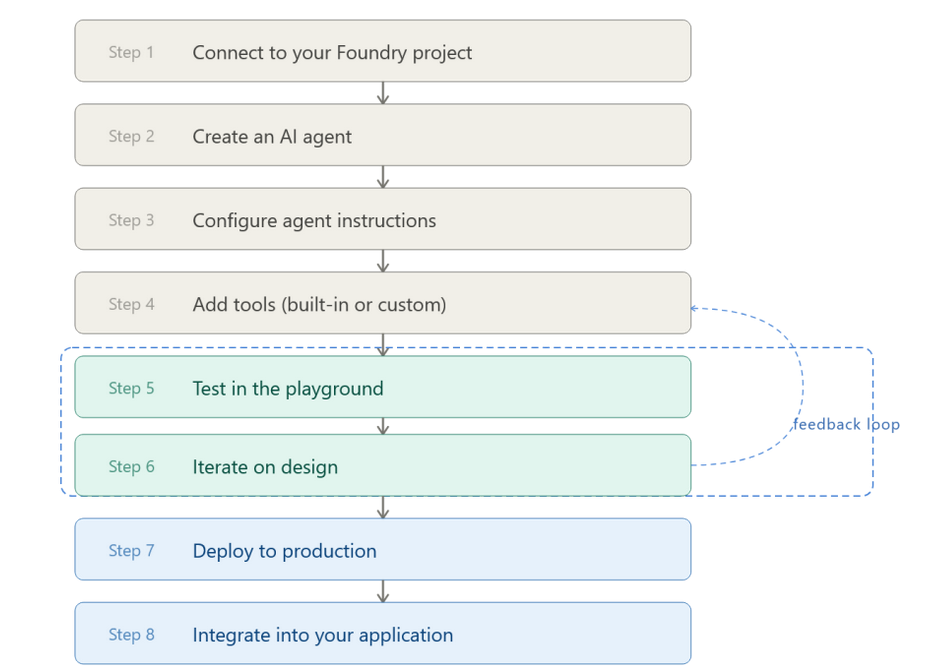
Steps 5 and 6 are where most of the real work happens. The playground in Foundry lets you have live conversations with your agent, inspect what tools it called, and see exactly how it reasoned through the problem. That feedback loop is fast – much faster than deploying code, testing, debugging, redeploy.
What Foundry Handles So You Don’t Have To
This is the part I emphasise most with architects, because it changes the infrastructure conversation significantly:
| Concern | Manual Approach | With Foundry |
| Conversation state | You build a session store | Managed automatically via threads |
| Tool calling | You parse LLM output and route calls | Handled by the agent runtime |
| Retry logic | You implement it | Built in |
| Scaling | You configure compute | Serverless, auto-scales |
| Monitoring | You hook up Application Insights manually | Integrated telemetry |
That’s a significant engineering shortcut – one that lets a team of two ship something that previously would have taken a team of six.
Real-World Consideration: Cost and Governance
One thing the demos don’t always show: Foundry runs on top of Azure services, and each of those has a cost dimension.
- Every LLM call costs tokens – monitor your model usage
- Azure AI Search has its own SKU and query cost model
- Functions and Storage are relatively cheap but add up at scale
My recommendation: set up Azure Cost Management alerts from day one. Define a budget threshold per environment (dev/test/prod). I’ve seen perfectly good proofs-of-concept die in procurement because nobody tracked what the dev environment was spending for six weeks.
Also – governance. Know who can create agents, which models are approved, and what data those agents can access. These aren’t Foundry questions specifically; they’re organisational questions you need to answer before you scale.
Pros and Cons of Foundry
Pros:
- Genuinely reduces infrastructure complexity
- Model-agnostic – swap LLMs without rewriting agent logic
- Excellent playground for rapid iteration
- Native Azure RBAC and identity integration
- Growing ecosystem of connectors and integrations
Cons:
- Azure lock-in – if you need multi-cloud agent portability, plan carefully
- Some advanced customisations still require code
- The UI evolves fast – documentation occasionally lags the product
- Cost visibility requires proactive setup
Foundry is not magic. You still need to think carefully about what your agent should and shouldn’t do, how failure cases are handled, and what happens when the LLM reasons incorrectly. But it removes a whole class of infrastructure problems from your plate, and for most enterprise teams, that’s exactly what’s needed to move from “AI proof-of-concept” to “AI in production”.
Next up: I’ll walk through how to configure agent instructions properly – because the quality of what you put in the instructions field is what separates a useful agent from an expensive chatbot.